Automatically Upload Files to Google Drive (Easiest Way in 2025)
In this article, we will show you how to automatically upload files to Google Drive. Simply follow the steps below.
How to Automatically Upload Files to Google Drive
To automatically upload files to Google Drive, follow the process below.
1. Download and Install Google Drive for Desktop
If you haven’t already, download and install Google Drive for Desktop from the Google Drive download page.

2. Sign In to Your Google Account
Open the Google Drive for Desktop app and sign in with your Google account credentials.

3. Open Preferences
Click on the Google Drive icon in the system tray (Windows) or menu bar (Mac) to open the Google Drive app menu. Click on the gear icon (Settings) and select “Preferences.”

4. Select Folders to Sync
In the Preferences window, under the “My Computer” tab, click on “Add folder.” Navigate to the folder on your computer that you want to automatically upload to Google Drive and select it.

5. Choose Sync Preferences
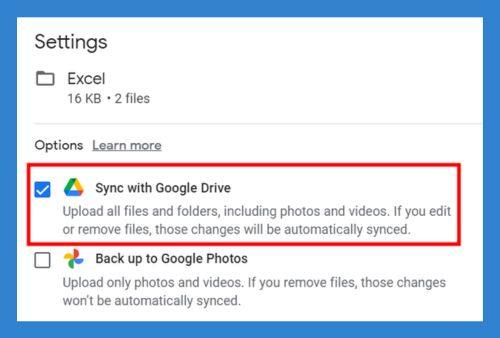
After selecting the folder, choose whether you want to sync files to Google Drive, Google Photos, or both. Click “Done” to confirm your selection.

6. Apply Changes
Click “Save” or “Apply” in the Preferences window to save your settings. The selected folder will now automatically sync with Google Drive, uploading any new files or changes.

7. Verify Sync Status
Ensure that the sync status is active by checking the Google Drive icon in the system tray (Windows) or menu bar (Mac). It should indicate that files are being synced.


We hope you now have a better understanding of how to automatically upload files to Google Drive. If you enjoyed this article, you might also like our article on how to upload a ZIP file in Google Drive or our article on how to transfer ownership on Google Drive.

